ATD Blog
Which Video Creation and Editing Tool Is Right for You?
Thu Feb 06 2014

Whether it’s stand-alone video hosted through popular channels like YouTube or embedded video in websites and e-learning courses, video content is everywhere. With the many creation and editing tools available, you can create video content affordably, quickly, and easily—even if you’re a novice user. It’s often just a matter of selecting the tool (or tools, realistically) that’s right for you.
To start the selection process, you will need to answer a few questions:
What is the purpose of your video?
What kind of video are you interested in creating and delivering?
Are you editing existing (recordings and files) video or creating new video?
What will you do with the finished video?
Once you have answers to these questions, it will be easier to decide which video tools may be right for you. Below, are some of my favorite and affordable tools for video creation and editing. They all have a variety of strengths and weaknesses and, in some cases, are particularly powerful for very specific types of video. I hope this will provide some guidance as you search for a video creation or editing tool that will meet your needs.
When reviewing the specifics of each tool, here are some important video creation tips to keep in mind.
When it comes to embedding video in a website or e-learning course, the MP4 file format is best. This video file format is widely accepted across e-learning content creation tools and is supported on nearly all modern computers, tablets, and smartphones. This means that if you want your video to be accessible across a variety of devices, make sure your video tool can output to the MP4 file format.
Most video creation tools can create video output at various resolutions and aspect ratios. The larger the video resolution, the better it will appear, but the video’s file size can become monstrous and cause long load times for the viewer. Choose an aspect ratio that makes sense for the type of device the majority of your viewers will use. 4:3 and 16:9 are the most common options, with 16:9 particularly well suited for wide-screen devices.
Some tools let you compress your video or save it as a different file format. While these can often be helpful tools, note that video compression often results in a loss of video quality (crispness), and the more you compress the video, the more quality you’ll lose. Note that most online video hosting sites such as YouTube will also compress your video upon upload.
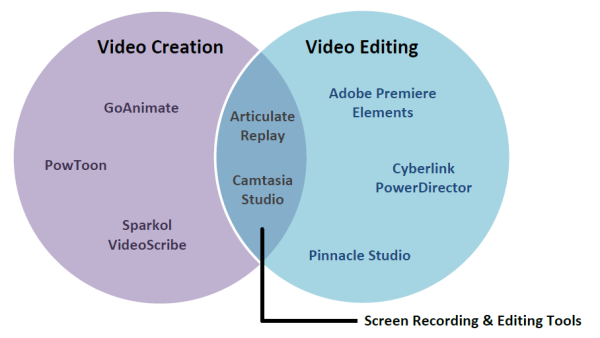
Tools for Video Creation
With these tips in mind, here are several video creation and editing tools that may help you with your next project. I’ve listed them (alphabetically) based on their type–for video creation or for video editing. The below chart summarizes where these tools fall within each type.
All of the tools mentioned in this section have both sample videos and video tutorials available on their websites. Both will give you a great idea of the types of videos that can be created, along with the development environment for creating them.
GoAnimate, http://goanimate.com
How much is it? Starting at $39/month or $299/year
Windows or Mac? Both (Web-based)
Pros: The free version definitely lets you get a good feel for the options available and how to use the tool. Also, the text-to-speech feature is very cool and could help save loads of time.
Cons: The text-to-speech feature still sounds computer-generated. It’s not even to Siri-quality just yet, it seems.
GoAnimate is a web-based video creation tool that lets you create cartoon-like videos. There is a free version with limited “themes” (aka templates) you can use to get started, or you can create your cartoon video from scratch.
Using GoAnimate, you create your cartoon using a timeline interface and develop your video scene by scene. Each basic scene consists of a background, a character, a character action, and narration or music. You select these elements from an extensive library. For example, backgrounds include an office, a kitchen, a library, a classroom, and others.
There are a variety of different-styled male and female characters, and the available actions are character movements such as walking across the scene, drinking a cup of coffee, jumping excitedly, and more (a lot more). While your character performs each action, you can have music in the background or have your character speak something.
Your character’s speech can be created by recording your own narration, importing an audio file, or using the text-to-speech option, which includes American British, Indian and Spanish. While I’ve not spent a lot of time with GoAnimate, it seems to be a fun tool and relatively easy to use. Just keep in mind, cartoons aren’t always appropriate.
PowToon (beta, www.powtoon.com
How much is it? Free limited version, premium plan $59/month or $228/year
Windows or Mac? Both (Web-based)
Pros: There’s a free, nearly full-featured version (with limits on how you can use your produced video). If you have any experience with timeline-based tools, you should be able to master PowToon quickly. A little imagination can take you a long way, but if you have some graphic capabilities to incorporate some of your own images and clipart, that will greatly expand your capabilities.
Cons: The clipart library is limited, and you can’t synchronize audio with your page timelines.
PowToon is a web-based video creation tool that lets you create and edit your own clip-art-based videos. The free Beta version of PowToon lets you get started immediately with project templates that hint at the types of video that are well-suited for the tool, specifically: promotional videos, slideshows, educational clips, infographic videos, or social clips.
Using PowToon, you create your video by dragging and dropping various text and clipart elements onto pages of your project. Each page has a timeline that you use to set your objects’ entry and exit times and apply a specific effect to the object’s appearance or disappearance. Traditional effects (dissolve, slide from left, slide from right, etc.) are available, as well as a hand effect which makes it look like a hand is pushing the element onto your canvas (or pulling it off).
The object library includes text blocks, animated text, characters (fancy stick figures), animated characters (animated fancy stick figures), props (hearts, stars, chat bubbles, dollar signs, etc.), shapes, and lines. There’s a decent amount of clipart to choose from, but there’s a good chance you’ll want to incorporate some of your own graphics as well. You can also record and add background narration or import an audio file. You’ll definitely want to take a look at some of the sample video that’s on its website to get an idea of what you can create.
Sparkol VideoScribe, www.sparkol.com
How much is it? $26/month, $192/year, $640/lifetime
Windows or Mac? Both
Pros: Sparkol VideoScribe is easy enough to use, and there are video tutorials available that will help you get started right away. The image library provides a lot to work with, but as with PowToon, additional graphic capabilities will go a long way.
Cons: It does not output to MP4, only MOV or FLV. Canvas positioning can be frustrating if you don’t know what you’re doing.
Sparkol VideoScribe is similar to PowToon. It is a stand-alone video creation tool that is particularly well-suited for marketing videos, process flows, and animated infographics. Remember those nifty UPS white-board commercials? VideoScribe lets you create something quite similar.
Using VideoScribe, you can place text and a variety of clip-art images onto your canvas. VideoScribe animates these objects by displaying a hand holding a marker or pencil that appears to be drawing the image or text on the canvas. You can specify the draw time for each object and its position on the canvas. Your canvas can grow to as large as it needs to be, and you’re not limited in the direction in which you can move.
For example, if you wanted to show a circular process, you can position the elements on your canvas in such a way that the video moves in a circular direction as each process is drawn. You can also add a soundtrack to your video scribe, or you can record narration for it.
Tools for screen recording and editing
The following tools can be considered both video creation and editing tools. On the creation side, they both have screen recording functionality to record your computer screen and mouse movements. On the editing side, they both also let you import existing video files and edit them.
Articulate Replay, www.articulate.com/products/replay.php?free=y
How much is it? FREE with Articulate Storyline or Articulate Studio! (for now), $200 if purchased separately
Windows or Mac? Win only
Pros: Replay makes it easy to record from your webcam while recording your screen and switch the video in focus once on your timeline.
Cons: Limited editing capabilities may have you yearning for more.
Articulate Replay is a basic but useful tool for screen recordings. You can record from your webcam simultaneously with your screen recording, and they make it super easy to switch between the two (your webcam recording or your screen recording) when you’re editing your video.
You can place full focus on the screen recording, on the webcam, or you can use picture-in-picture to show one or the other in the corner of the screen. You can also add your own video, audio, and images. Editing features are very basic, but they do the job well. Finally, you can place “lower thirds” in the videos, as well—this is just a fancy term for titles, but they look very nice within the video.
Camtasia Studio, www.techsmith.com/camtasia.html
How much is it? $299 Windows, $99 Mac (Camtasia for Mac)
Windows or Mac? Both
Pros: This tool provides really robust video-editing in an easy-to-use environment. It’s a superb tool for creating product demos and tutorials.
Cons: I wish the webcam recording feature was separate from the screen recording. If you want to record from your webcam, you have to do it while also capturing your screen.
Camtasia Studio is ideal for software demos and tutorials. It lets you record your entire desktop or a specific window or application. It’s a powerful editor as well. Once you have your video content (either your screen recording or your imported video file), you drag it onto a traditional timeline to crop it, extend frames, zoom in and out, add text and images, annotate your video, highlight portions of the video, fade in and out, add music or record narration, add closed captioning, and more.
What sets Camtasia Studio apart from the other video editing tools is all of the easy-to-use text, shape, and zoom/pan tools that can enhance your video and emphasize what’s on screen. I’ve been using Camtasia for years, and yes, I’m very partial to it. I find it very easy to work with—and that’s despite the fact that I have to re-learn it every time I use it. (My video work has always been in spurts.)
It really does provide a robust set of features to create professional video. The Mac version doesn’t appear to be quite as full-featured as the Windows version, but it looks like it includes all of the same features purely for video creation and editing.
Tools for Video Editing
For the most part, this tool set assumes you already have the video files you want to edit. With many of the popular video editing tools, you get a lot of the same features. All of the following tools include a timeline editing environment and asset bin for storing the images and video files used in your timeline.
Adobe Premiere Elements, www.adobe.com/products/premiere-elements.html
How much is it? $149.99
Win or Mac? Both
Pros: All of your basic video editing needs are bundled in a relatively inexpensive product.
Cons: The interface isn’t totally intuitive, and the publish menu makes it difficult to determine the video file type you’re producing. It assumes you’re delivering your video on a single device, whereas for many of us in e-learning, our videos must be able to be played across a variety of devices.
Adobe Premiere Elements is purely for video editing, but does let you capture video from your webcam. You start by adding your media–video files stored on your computer or captured from your phone, tablet, or camera. Premiere Elements provides a number of tools for cropping your video, adjusting the playback speed (to create slow motion scenes, for example), adding titles, text, images, animated graphics, audio, and narration to your video.
It even has a variety of features for color correction and applying special color effects to your video. Premiere Elements isn’t as intuitive as I’d like it to be, but in version 12, a new “Guided Edits” feature walks you through basic editing tasks and can help you quickly get started. Note that Adobe Premiere Elements is a less expensive version of the more feature-rich Adobe Premiere.
Cyberlink PowerDirector, www.cyberlink.com
How much is it? $74.99
Win or Mac? Win only
Pros: There appear to be a ton of additional stock intros and picture-in-picture objects that you can download. For basically half the price of Adobe Premiere Elements, it is definitely an alternative worth considering.
Cons: Why have I not heard of this before now?
I honestly hadn’t heard of PowerDirector until recently, but it has received all kinds of awards from PC Magazine, so I decided to give it a try. To start, PowerDirector has an “Easy Editor” mode that takes you to a wizard that walks you through a very basic video creation process. I went straight for the “Full-Featured Editor.”
There are more than enough features for improving video quality and colors. You also have effects you can apply, stock intros you can use, picture-in-picture objects you can insert, transitions you can apply between scenes, audio recording options, and an easy-to-use subtitle input area. It seems to be in line with the feature set of Adobe Premiere Elements, but I personally think this interface might be a little easier to use.
Pinnacle Studio, www.cyberlink.com
How much is it? 3 versions starting at $59.99
Win or Mac? Win only
Pros: The Plus and Ultimate versions include screen-recording features.
Cons: There’s no trial!
The three versions of Pinnacle Studio increase in feature-set as they increase in price. But even the most feature-filled version (Pinnacle Studio Ultimate) is cheaper than Adobe Premiere Elements. I haven’t used Pinnacle Studio in years, and unfortunately they don’t have a free trial. But from what I remember, the interface was incredibly intuitive, and there were enough tools to make editing a breeze. The feature set, no doubt, is similar to the above-mentioned video editing tools, but the Plus and Ultimate versions also include screen-recording.