ATD Blog
Creating Your First Augmented Reality Experience
Tue Jan 12 2021
Content
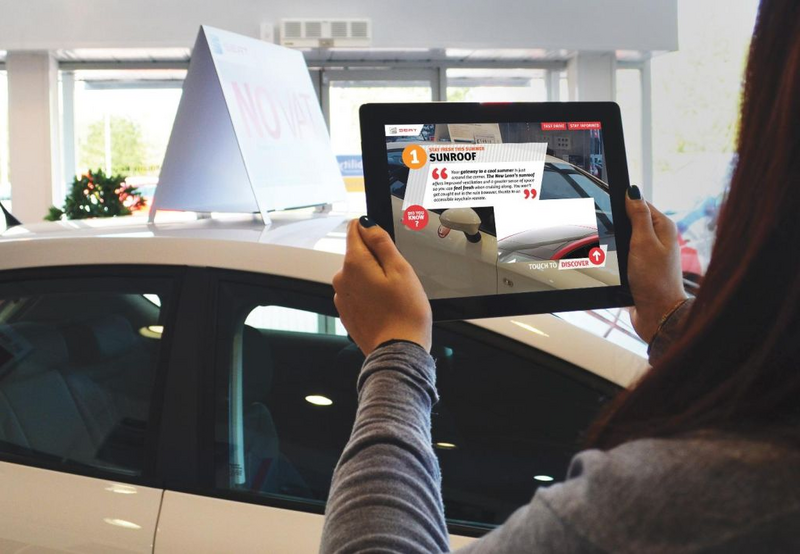
You have probably been hearing a lot about augmented reality (AR) lately. There is a lot to explore in this realm. I think it has massive potential for L&D, especially with regards to performance support.
You have probably been hearing a lot about augmented reality (AR) lately. There is a lot to explore in this realm. I think it has massive potential for L&D, especially with regards to performance support.
Content
Any learner can pull out their device, scan an object or image, and have performance support material overlay the 3D object or scanned image. A technician on the job site, for example, could need help and use the AR experience to solve the issue.
Any learner can pull out their device, scan an object or image, and have performance support material overlay the 3D object or scanned image. A technician on the job site, for example, could need help and use the AR experience to solve the issue.
Content
So, how do you get started? I want to walk you through creating your first AR experience using nothing but your iPad or iPhone.
So, how do you get started? I want to walk you through creating your first AR experience using nothing but your iPad or iPhone.
Content
Pull out your device and go into the app store. There are a few different apps you can use, but let’s use Adobe Aero for this example. I love the integration that comes with Photoshop and other Adobe products.
Pull out your device and go into the app store. There are a few different apps you can use, but let’s use Adobe Aero for this example. I love the integration that comes with Photoshop and other Adobe products.
Content
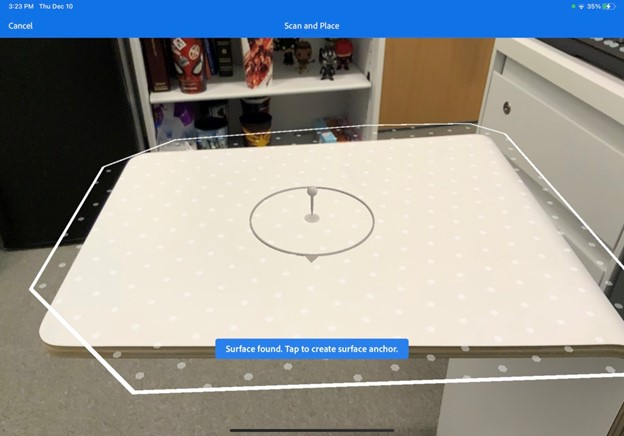
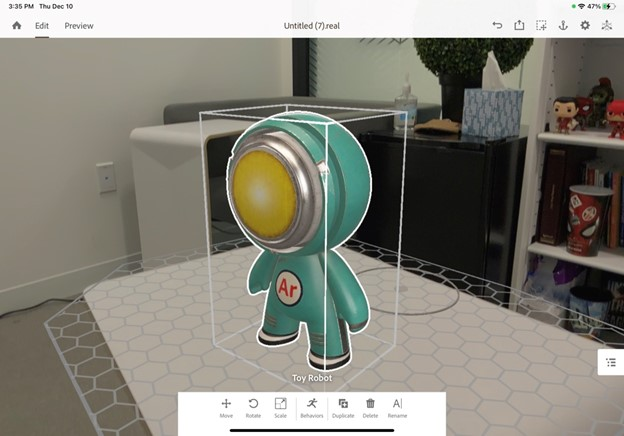
Once you download the app, open it and create a new project by clicking on the “Create new” button on the screen’s bottom-left side. Adobe Aero has you create an AR experience right within AR. You will need a flat surface to get started. Scan the flat surface then tap where you want to place your project.
Once you download the app, open it and create a new project by clicking on the “Create new” button on the screen’s bottom-left side. Adobe Aero has you create an AR experience right within AR. You will need a flat surface to get started. Scan the flat surface then tap where you want to place your project.
Content
Remember that you can change the anchor type to something else like a 3D object or image later. You can also create these AR experiences using Aero’s beta desktop app if you do not have access to an iOS device.
Remember that you can change the anchor type to something else like a 3D object or image later. You can also create these AR experiences using Aero’s beta desktop app if you do not have access to an iOS device.
Content
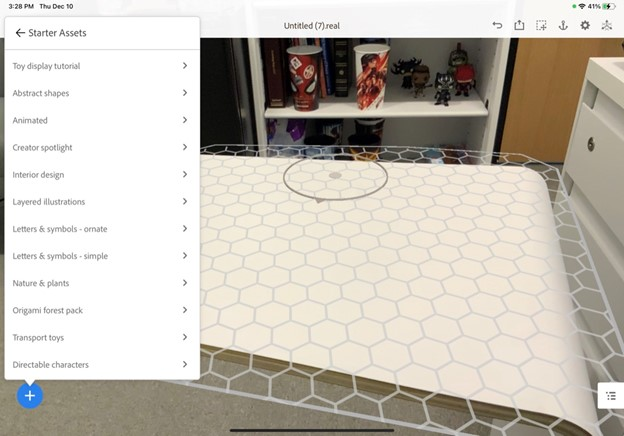
Once you have the anchor in place, you are now ready to start adding content. This could be content from sites like poly.google.com, turbo squid, custom 3D objects made in Maya, or even Adobe Dimension. Adobe Dimension is a straightforward tool to create 3D models, and it is part of your Adobe Creative Cloud subscription.
Once you have the anchor in place, you are now ready to start adding content. This could be content from sites like poly.google.com, turbo squid, custom 3D objects made in Maya, or even Adobe Dimension. Adobe Dimension is a straightforward tool to create 3D models, and it is part of your Adobe Creative Cloud subscription.
Content
Aero has some default objects you can use. Click on the plus icon on the bottom-left corner and find a 3D model you want to use.
Aero has some default objects you can use. Click on the plus icon on the bottom-left corner and find a 3D model you want to use.
Content
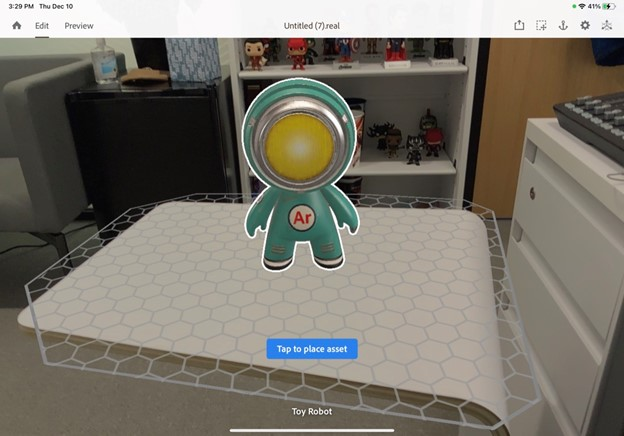
You can also insert PSD files from Photoshop, 2D images, and videos within your AR experience. Select the asset you want then move the camera around and tap where you want to place the asset.
You can also insert PSD files from Photoshop, 2D images, and videos within your AR experience. Select the asset you want then move the camera around and tap where you want to place the asset.
Content
With the object in place, you can down move your camera around and get different angles of your 3D object. Keep in mind that we are still in editing mode, so we can reposition the object by dragging and dropping it wherever we want. If you want to preview this exactly how the learner will see it, you can click on the preview button on top.
With the object in place, you can down move your camera around and get different angles of your 3D object. Keep in mind that we are still in editing mode, so we can reposition the object by dragging and dropping it wherever we want. If you want to preview this exactly how the learner will see it, you can click on the preview button on top.
Content
In preview mode, you can also take screenshots to share with other people. There is a lot more than you can do with Aero, but keep in mind that even this kind of experience allows a learner to see objects in the real world without getting access to it.
In preview mode, you can also take screenshots to share with other people. There is a lot more than you can do with Aero, but keep in mind that even this kind of experience allows a learner to see objects in the real world without getting access to it.
Content
That means that if I am learning about a particular object I will be working with later on, I could get a preview of what that object will look like and maybe tap on various parts of the object to learn more about it. Just a lot of possibilities here! I get excited thinking about all the different applications for L&D augmented reality has.
That means that if I am learning about a particular object I will be working with later on, I could get a preview of what that object will look like and maybe tap on various parts of the object to learn more about it. Just a lot of possibilities here! I get excited thinking about all the different applications for L&D augmented reality has.
Content
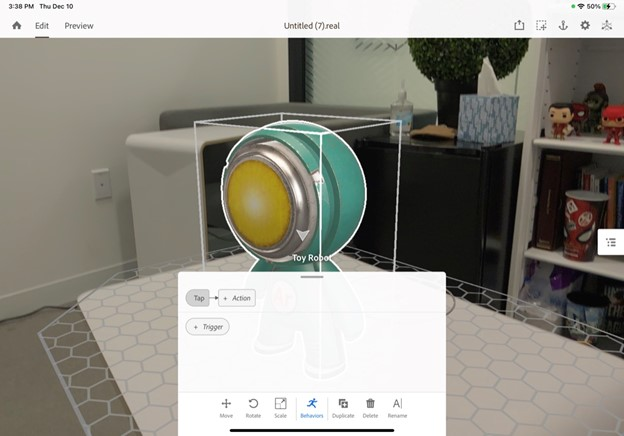
OK, now let’s add some interactivity to it. Go back into edit mode. Tap the object you want to apply the action to. In our case, we only have one object so far but keep in mind we can add more objects to build our scene.
OK, now let’s add some interactivity to it. Go back into edit mode. Tap the object you want to apply the action to. In our case, we only have one object so far but keep in mind we can add more objects to build our scene.
Content
With that tapped, a menu bar shows up on the bottom. This allows us to move and rotate the object and more. The action we are looking for, though, is the “Behaviors.” Click on that.
With that tapped, a menu bar shows up on the bottom. This allows us to move and rotate the object and more. The action we are looking for, though, is the “Behaviors.” Click on that.
Content
With the behavior, we first select what will Trigger this behavior. When I tap Trigger, I see three options: Start (when the scene starts), Tap (when the user taps the object), and Proximity (when the user comes close to the object with their device). Select Tap.
With the behavior, we first select what will Trigger this behavior. When I tap Trigger, I see three options: Start (when the scene starts), Tap (when the user taps the object), and Proximity (when the user comes close to the object with their device). Select Tap.
Content
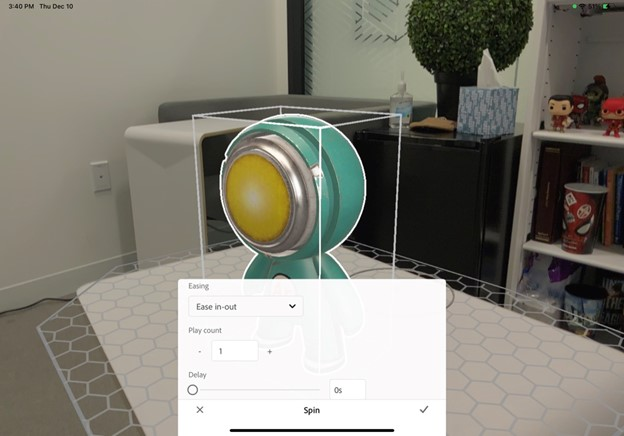
Now with a Tap trigger in place, let’s select the action. You can do a lot, and it takes some time to play around with these triggers to get used to them.
Now with a Tap trigger in place, let’s select the action. You can do a lot, and it takes some time to play around with these triggers to get used to them.
Content
Let’s do a simple spin. Adjust options like axis, duration, delay, and easing. Once you are finished, click on the checkmark.
Let’s do a simple spin. Adjust options like axis, duration, delay, and easing. Once you are finished, click on the checkmark.
Content
I can sequence and add more actions as needed. Preview and tap on the object and watch it spin around.
I can sequence and add more actions as needed. Preview and tap on the object and watch it spin around.
Content
That’s it! Once you are ready to share, tap the share button on the top right. You can share a link, export to Behance, or export to be text-messaged, emailed, or placed on a website.
That’s it! Once you are ready to share, tap the share button on the top right. You can share a link, export to Behance, or export to be text-messaged, emailed, or placed on a website.

Content
We just barely scratched the surface here. There is a lot more you can do with Aero. To learn more, check out my session at ATD TechKnowledge 2021 .
We just barely scratched the surface here. There is a lot more you can do with Aero. To learn more, check out my session at ATD TechKnowledge 2021.