ATD Blog
Toolbox Tip: 3 Easy Steps to Making Videos with Articulate Replay
Mon Dec 30 2013

In recent years, the flipped classroom teaching model has become a popular alternative to traditional classroom lectures. The flipped classroom simply means the instructor delivers content—often via videos—before a class to improve the learning that happens during a class.
Replacing traditional in-class lectures with pre-recorded videos allows learners to pause, rewind, and rewatch content, so they can learn at their own pace. Then, they can work on lessons and exercises in class, where they benefit from the support of their instructor and other students, instead of struggling alone at home.
Learning developers using Articulate Replay can build “flipped” videos by following these three steps.
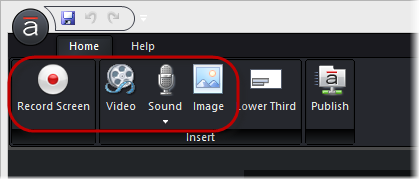
Step 1: Record your screen activity and webcam
Articulate Replay lets developers record screencasts of computer desktop activity and webcam videos—at the same time or separately. Click the Record Screen button, size the recording window, and click the Record button when you’re ready to start.
You can learn more about Adding Screen Recordings and Webcam Videos here.

Tip: If you plan to incorporate any existing videos, you will want to adjust the dimensions of any new recordings to match. The largest video in your project dictates the output size in Replay. If you have videos with different sizes and aspect ratios, it could create distortion or an unwanted letterbox effect in your final output.
Step 2: Add existing content
Articulate Replay lets developers import existing content into your project along with any new recordings. For example, you may have collected an assortment of favorite videos, audio files, and images that you like to use in traditional classrooms. With Replay you can import them all right into your project along with any new recordings.
You can learn about adding media to an Articulate Replay project here.
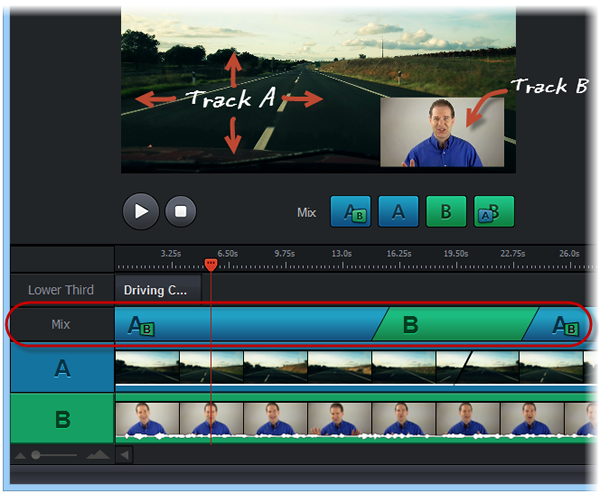
Step 3: Arrange, mix, and publish
Once you have everything you need, you’re ready to arrange your media using the Timeline feature. The Timeline is where you control the appearance of your video by positioning media elements, setting their duration, and adjusting video mixes.
Any time you add audio, video, or images, they’ll automatically appear on the two-track media timeline. Imported content will initially be added to the end of track A, but you can move it anywhere you like. Just drag it to the track and location you want and Replay will automatically apply a seamless transition between your images and video clips.
When both tracks include content, you can use the Mix buttons to control how your videos display. With a click, you can flip between track A and track B, or show both tracks at once by using a picture-in-picture option. It’s totally up to you!
As you are working, use the Play/Pause and Stop buttons above the Timeline to preview your project. Once you’ve got everything just the way you want it, the Publish button will encode your project as an MP4 video. Perfect for using in your flipped classroom.
You can learn more about working with the timeline in Articulate Replay here.
So, if you’re thinking of flipping your classroom, take Articulate Replay for a spin and see for yourself how you can use it to create engaging instructional videos.