ATD Blog
Toolbox Tip: 6 Easy Ways to Maintain Design Consistency in Articulate Storyline
Tue Mar 17 2015
Content
When I first started using Articulate Storyline, I struggled with maintaining design consistency within an e-learning course. Buttons would look slightly different from one slide to the next, and I spent countless hours re-creating the same background graphics used on each slide or manually applying the same effects to multiple objects.
When I first started using Articulate Storyline, I struggled with maintaining design consistency within an e-learning course. Buttons would look slightly different from one slide to the next, and I spent countless hours re-creating the same background graphics used on each slide or manually applying the same effects to multiple objects.
Content
Over the years, I’ve learned that Storyline is chock-full of features that not only help you maintain design consistency, but also help you save a ton of time in the process. Here are my top six, easy-to-use features that will help you maintain design consistency and save time in Articulate Storyline.
Over the years, I’ve learned that Storyline is chock-full of features that not only help you maintain design consistency, but also help you save a ton of time in the process. Here are my top six, easy-to-use features that will help you maintain design consistency and save time in Articulate Storyline.
Content
#1: Slide Masters
#1: Slide Masters
Content
**
**
Content
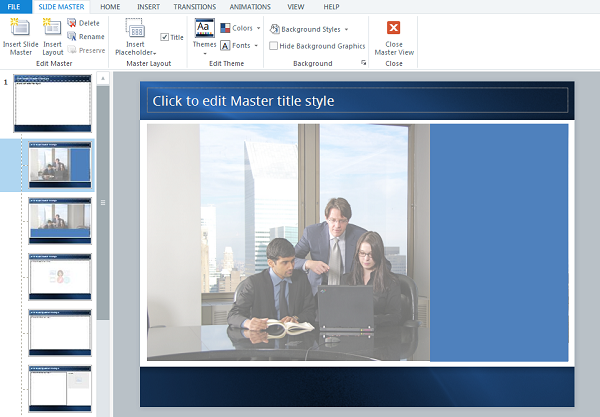
What are they? Like PowerPoint, slide masters let you design a series of layouts that apply the same look and feel across multiple slides. Slide masters can include images, shapes, placeholders, buttons, and even slide layers.
What are they? Like PowerPoint, slide masters let you design a series of layouts that apply the same look and feel across multiple slides. Slide masters can include images, shapes, placeholders, buttons, and even slide layers.
Content
Why do I love them? Rather than placing the same background image or header/footer on each individual slide, you can place these items on a slide master and apply them to your entire course all at once. Additionally, you can create multiple layouts if you need variations of the original design.
Why do I love them? Rather than placing the same background image or header/footer on each individual slide, you can place these items on a slide master and apply them to your entire course all at once. Additionally, you can create multiple layouts if you need variations of the original design.
Content
Learn more about using Slide Masters here .
Learn more about using Slide Masters here.
Content
#2: Theme Colors
#2: Theme Colors
Content
**
**
Content
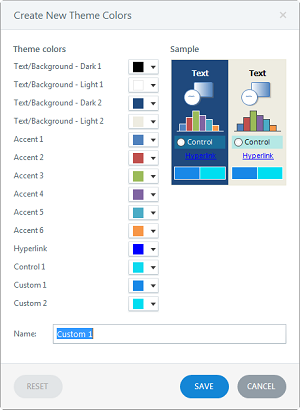
What are they?** Again, just like PowerPoint, you can use theme colors to determine the default colors that appear when you format objects such as text, shapes, captions, outlines, or buttons. When you change the fill or outline color of an object, the current theme colors and shade variants are displayed across the top of the color palette. If you change the color theme, you can have the colors you want for your project appear in all the color palettes instead.
What are they?** Again, just like PowerPoint, you can use theme colors to determine the default colors that appear when you format objects such as text, shapes, captions, outlines, or buttons. When you change the fill or outline color of an object, the current theme colors and shade variants are displayed across the top of the color palette. If you change the color theme, you can have the colors you want for your project appear in all the color palettes instead.
Content
Why do I love them? Theme colors offer three great benefits:
Why do I love them? Theme colors offer three great benefits:
Content
If graphic design isn’t a strength of yours, you can trust that the various color themes built into Storyline have been created by professional graphic designers and will look good with most designs.
If graphic design isn’t a strength of yours, you can trust that the various color themes built into Storyline have been created by professional graphic designers and will look good with most designs.
Content
You can update your entire course at once. If you decide to change the theme colors, any object that uses one of the default colors from the color palette will take on the colors of the newly selected theme.
You can update your entire course at once. If you decide to change the theme colors, any object that uses one of the default colors from the color palette will take on the colors of the newly selected theme.
Content
You can create and save a custom set of theme colors from the Design tab. This is especially useful if you’re required to follow certain branding standards set by your client or organization.
You can create and save a custom set of theme colors from the Design tab. This is especially useful if you’re required to follow certain branding standards set by your client or organization.
Content
Learn more about using and creating custom theme colors here .
Learn more about using and creating custom theme colors here.
Content
#3: Theme Fonts
#3: Theme Fonts
Content
**
**
Content
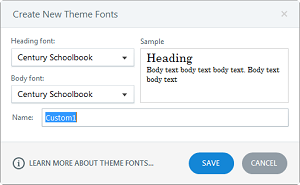
What are they?** Similar to theme colors, you can also create custom theme fonts to use throughout your project. Each theme includes a font family that governs the default heading and body text fonts. The heading font is used in title placeholders, and body text is used with text content placeholders. As with colors, you can change the default fonts to one of the built-in options or create your own font theme from the Design tab.
What are they?** Similar to theme colors, you can also create custom theme fonts to use throughout your project. Each theme includes a font family that governs the default heading and body text fonts. The heading font is used in title placeholders, and body text is used with text content placeholders. As with colors, you can change the default fonts to one of the built-in options or create your own font theme from the Design tab.
Content
Why do I love them? I love using theme fonts for all the same reasons I love using theme colors. The built-in font themes have been designed by graphics designers, so you know the pairings work. You can select a different font theme anytime during the development process, and all text objects using the heading and body style will be updated. And you can create your own custom font themes to create the look you want or to match the branding of your organization or client.
Why do I love them? I love using theme fonts for all the same reasons I love using theme colors. The built-in font themes have been designed by graphics designers, so you know the pairings work. You can select a different font theme anytime during the development process, and all text objects using the heading and body style will be updated. And you can create your own custom font themes to create the look you want or to match the branding of your organization or client.
Content
Learn more about using and creating custom theme fonts here .
Learn more about using and creating custom theme fonts here.
Content
#4: Templates
#4: Templates
Content
**
**
Content
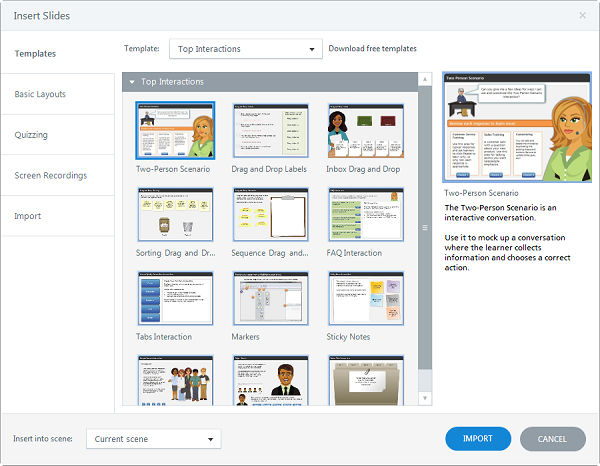
What are they?** An Articulate Storyline template file (.storytemplate) is a collection of one or more slides that have been designed and saved for sharing and reuse. You can take a file that has the slide masters, colors themes, and settings you want and turn it into a template that can be reused later.
What are they?** An Articulate Storyline template file (.storytemplate) is a collection of one or more slides that have been designed and saved for sharing and reuse. You can take a file that has the slide masters, colors themes, and settings you want and turn it into a template that can be reused later.
Content
Why do I love them? Templates are great if you plan on creating multiple courses with the same look and feel. Because templates can include multiple slide masters that include content placeholders, they make it easy to insert new content, while maintaining a consistent design.
Why do I love them? Templates are great if you plan on creating multiple courses with the same look and feel. Because templates can include multiple slide masters that include content placeholders, they make it easy to insert new content, while maintaining a consistent design.
Content
Because the look and feel of a course evolves throughout the development process, I typically wait until I’ve finished building a course to create and share the template file. This ensures that the template contains all of the necessary design elements for the next course.
Because the look and feel of a course evolves throughout the development process, I typically wait until I’ve finished building a course to create and share the template file. This ensures that the template contains all of the necessary design elements for the next course.
Content
Learn more about workingwith templates here .
Learn more about workingwith templates here.
Content
#5: Set as Default
#5: Set as Default
Content
**
**
Content
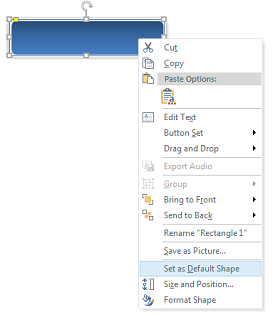
What is it?** Set as Default is one of those powerful features that is hidden in plain sight and rarely used. Let’s say you’ve spent some time formatting a shape or button to have a particular color, font, shadow, and so forth.
What is it?** Set as Default is one of those powerful features that is hidden in plain sight and rarely used. Let’s say you’ve spent some time formatting a shape or button to have a particular color, font, shadow, and so forth.
Content
You’d like to use this custom look for all of the buttons or shapes that you insert into your project. Rather than reformatting each new button or shape to match the original, you can set it as the default. This means the next time you add a new object of that type, Storyline will use this design as the default formatting. For example, you can set one default design for shapes and a separate one for buttons.
You’d like to use this custom look for all of the buttons or shapes that you insert into your project. Rather than reformatting each new button or shape to match the original, you can set it as the default. This means the next time you add a new object of that type, Storyline will use this design as the default formatting. For example, you can set one default design for shapes and a separate one for buttons.
Content
Why do I love it? Set as Default is a simple way to save you a few extra clicks when formatting a shape, caption, text box, marker, or button. What I love is that Set as Default is project-specific. This means that your selections won’t interfere with your other Storyline projects.
Why do I love it? Set as Default is a simple way to save you a few extra clicks when formatting a shape, caption, text box, marker, or button. What I love is that Set as Default is project-specific. This means that your selections won’t interfere with your other Storyline projects.
Content
Learn more about using Set as Default with shapes here .
Learn more about using Set as Default with shapes here.
Content
#6: Format Painter
#6: Format Painter
Content
**
**
Content
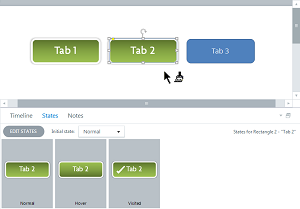
What is it?** The format painter is another one of those great features that originated in programs like Microsoft PowerPoint and was brought over to Storyline. The Format Painter is simple: It lets you copy the formatting from object to another.
What is it?** The format painter is another one of those great features that originated in programs like Microsoft PowerPoint and was brought over to Storyline. The Format Painter is simple: It lets you copy the formatting from object to another.
Content
Why do I love it? Just like Set as Default, the format painter is a great way to save you a few extra clicks. In addition to being great for copying and pasting the formatting like colors and fonts between objects, it’s also great for copying and pasting states between objects. That’s right, I said states! In Storyline, the states of the object being copied will be applied to the object being pasted to.
Why do I love it? Just like Set as Default, the format painter is a great way to save you a few extra clicks. In addition to being great for copying and pasting the formatting like colors and fonts between objects, it’s also great for copying and pasting states between objects. That’s right, I said states! In Storyline, the states of the object being copied will be applied to the object being pasted to.
Content
Learn more about using the format painter here . Learn more about states here .
Learn more about using the format painter here. Learn more about states here.
Content
So, there you have it: six easy ways to maintain design consistency and save time. What are some of your favorite ways to maintain design consistency and save time when developing in Articulate Storyline? Please share in the Comments below.
So, there you have it: six easy ways to maintain design consistency and save time. What are some of your favorite ways to maintain design consistency and save time when developing in Articulate Storyline? Please share in the Comments below.
Content
**
**