ATD Blog
Toolbox Tip: Recording Professional Quality Audio from Home
Wed Jul 23 2014
Content
Content
We all recognize the sound of poor quality audio when we hear it. Whether it’s unwanted static, an echo, or ambient room noise, bad audio can prevent an audience from clearly receiving the message and distract them from the content in an e-learning course.
We all recognize the sound of poor quality audio when we hear it. Whether it’s unwanted static, an echo, or ambient room noise, bad audio can prevent an audience from clearly receiving the message and distract them from the content in an e-learning course.
Content
Although I am a big proponent of using professionally recorded narration, the cost can prevent this from being an option for some. There’s also a perception that creating top-quality audio yourself is equally costly.
Although I am a big proponent of using professionally recorded narration, the cost can prevent this from being an option for some. There’s also a perception that creating top-quality audio yourself is equally costly.
Content
The truth is, though, recording and creating professional quality audio from home (or at the office) doesn’t require professional-grade tools, special training, or a multi-thousand dollar budget. All it takes is a few simple, cheap, and sometimes free tools and tips.
The truth is, though, recording and creating professional quality audio from home (or at the office) doesn’t require professional-grade tools, special training, or a multi-thousand dollar budget. All it takes is a few simple, cheap, and sometimes free tools and tips.
Content
Recording equipment
Recording equipment
Content
The biggest concern when it comes to recording professional quality audio is the cost of equipment. The lines between consumer-grade and professional-grade equipment have blurred greatly, and this is equally true in terms of price.
The biggest concern when it comes to recording professional quality audio is the cost of equipment. The lines between consumer-grade and professional-grade equipment have blurred greatly, and this is equally true in terms of price.
Content
Besides your computer, which most of us already have, you only need two major pieces of equipment to record your own audio: a decent quality microphone and a noise-canceling device.
Besides your computer, which most of us already have, you only need two major pieces of equipment to record your own audio: a decent quality microphone and a noise-canceling device.
Content
Choose a quality microphone . Microphones are like cars. No matter how much—or little—money you spend, a car will get you from point A to point B; however, the driving experience between a $10,000 car and a $50,000 car differs greatly.
Choose a quality microphone. Microphones are like cars. No matter how much—or little—money you spend, a car will get you from point A to point B; however, the driving experience between a $10,000 car and a $50,000 car differs greatly.
Content
The same is true for microphones. A cheap microphone will record audio just like an expensive one, but the quality won’t be the same. This is very important, as you can rarely compensate for bad audio recording quality after the fact.
The same is true for microphones. A cheap microphone will record audio just like an expensive one, but the quality won’t be the same. This is very important, as you can rarely compensate for bad audio recording quality after the fact.
Content
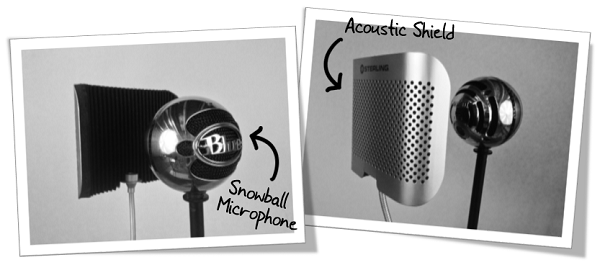
Does this mean you should purchase a top-tier microphone like this one for $2000+? Not at all! I think the sweet spot for a quality microphone, at a consumer price, would be this Snowball USB Microphone by Blue Microphones for $60. I use this as my everyday audio recording microphone, and it serves me well.
Does this mean you should purchase a top-tier microphone like this one for $2000+? Not at all! I think the sweet spot for a quality microphone, at a consumer price, would be this Snowball USB Microphone by Blue Microphones for $60. I use this as my everyday audio recording microphone, and it serves me well.
Content
Use a noise-cancelling device . Even a quality microphone won’t eliminate ambient room noise, static, and echoes. As a result, you should consider using a noise-cancelling device with your microphone. Because most of us can’t afford to cover an entire room with acoustic foam to create a recording booth, there are several cheaper options.
Use a noise-cancelling device. Even a quality microphone won’t eliminate ambient room noise, static, and echoes. As a result, you should consider using a noise-cancelling device with your microphone. Because most of us can’t afford to cover an entire room with acoustic foam to create a recording booth, there are several cheaper options.
Content
In my case, because the Snowball USB Microphone is encased, it already has noise-cancelling properties. All I’ve chosen to use a simple acoustic shield, which is positioned directly behind the microphone and prevents it from picking up any stray echoes. I purchased the shield from my local guitar shop for $20.
In my case, because the Snowball USB Microphone is encased, it already has noise-cancelling properties. All I’ve chosen to use a simple acoustic shield, which is positioned directly behind the microphone and prevents it from picking up any stray echoes. I purchased the shield from my local guitar shop for $20.
Content
Another option is to create a smaller version of a recording booth. A popular option is this Porta-Booth Plus , which you can purchase for $189.00. If that’s still outside of your budget, I’ve also seen people construct their own table-top recording booths, like this .
Another option is to create a smaller version of a recording booth. A popular option is this Porta-Booth Plus, which you can purchase for $189.00. If that’s still outside of your budget, I’ve also seen people construct their own table-top recording booths, like this.
Content
Recording environment
Recording environment
Content
Having a solid recording environment is essential to creating top-quality audio. Because a full-sized recording booth is usually not an option for most, you have to figure out how to work with that you have.
Having a solid recording environment is essential to creating top-quality audio. Because a full-sized recording booth is usually not an option for most, you have to figure out how to work with that you have.
Content
Find an environment with consistent sound qualities and silence . When evaluating a potential recording environment, close your eyes and listen to the ambient sounds. You’ll be surprised at what sounds you discover that you didn’t realize may be a potential issue.
Find an environment with consistent sound qualities and silence. When evaluating a potential recording environment, close your eyes and listen to the ambient sounds. You’ll be surprised at what sounds you discover that you didn’t realize may be a potential issue.
Content
Be aware of the following:
Be aware of the following:
Content
airflow vents/fans
airflow vents/fans
Content
neighbors/children
neighbors/children
Content
adjacent meeting rooms/offices
adjacent meeting rooms/offices
Content
outside car/air traffic
outside car/air traffic
Content
computer equipment
computer equipment
Content
fluorescent lights.
fluorescent lights.
Content
If you identify any of these potential audio interferences in your recording environment, attempt to dampen the sound with the tools I mentioned earlier. You may also find that the noise levels are less during certain times of the day. Of course, if you can’t avoid the noise, it may be time to find a new recording environment.
If you identify any of these potential audio interferences in your recording environment, attempt to dampen the sound with the tools I mentioned earlier. You may also find that the noise levels are less during certain times of the day. Of course, if you can’t avoid the noise, it may be time to find a new recording environment.
Content
Maintain a consistent recording environment . Even small changes to your environment can result in inconsistencies in the sound of your audio. Here are some guidelines to follow:
Maintain a consistent recording environment. Even small changes to your environment can result in inconsistencies in the sound of your audio. Here are some guidelines to follow:
Content
Maintain a consistent distance from the microphone.
Maintain a consistent distance from the microphone.
Content
Use the same microphone and recording settings for the duration of the recording session.
Use the same microphone and recording settings for the duration of the recording session.
Content
Attempt to complete the entire recording session in a single session.
Attempt to complete the entire recording session in a single session.
Content
Attempt to record each audio file in a single take.
Attempt to record each audio file in a single take.
Content
Make sure your energy doesn’t wane as you complete a long recording session.
Make sure your energy doesn’t wane as you complete a long recording session.
Content
Recording software
Recording software
Content
The final aspect of recording professional quality audio is the software. Just as with the quality of microphones, professional-grade software programs for recording and editing audio have become increasingly cheaper and more accessible to larger audiences. Selecting a recording and editing software program comes down to the features that are most important to you.
The final aspect of recording professional quality audio is the software. Just as with the quality of microphones, professional-grade software programs for recording and editing audio have become increasingly cheaper and more accessible to larger audiences. Selecting a recording and editing software program comes down to the features that are most important to you.
Content
Record and edit audio within the authoring tool . Because audio narration has become such an integral part of an e-learning course, most e-learning authoring tools come with built-in audio recording and editing features. These features are popular for quickly recording and performing minor audio edits; however, such built-in tools typically lack the features required to enhance audio quality.
Record and edit audio within the authoring tool. Because audio narration has become such an integral part of an e-learning course, most e-learning authoring tools come with built-in audio recording and editing features. These features are popular for quickly recording and performing minor audio edits; however, such built-in tools typically lack the features required to enhance audio quality.
Content
Record, edit, and enhance audio with recording software . I prefer recording, editing, and enhancing my audio with recording programs outside of my main e-learning authoring tool. These programs offer higher-end features that can significantly improve audio quality. Look for programs that offer noise reduction/cancelation and audio leveling/normalization.
Record, edit, and enhance audio with recording software. I prefer recording, editing, and enhancing my audio with recording programs outside of my main e-learning authoring tool. These programs offer higher-end features that can significantly improve audio quality. Look for programs that offer noise reduction/cancelation and audio leveling/normalization.
Content
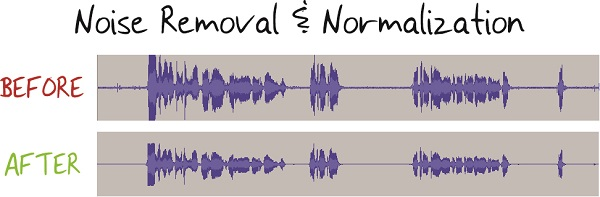
Below is an example of an audio waveform before and after noise removal and normalization are applied:
Below is an example of an audio waveform before and after noise removal and normalization are applied:
Content
As you can see, after these enhancements are added, the audio spikes are more consistent and there is less static in silent areas. These may seem like minor adjustment, but they will go a long way to improving the quality of the audio.
As you can see, after these enhancements are added, the audio spikes are more consistent and there is less static in silent areas. These may seem like minor adjustment, but they will go a long way to improving the quality of the audio.
Content
Some of my favorite recording and editing software programs include:
Some of my favorite recording and editing software programs include:
Content
Audacity (which is free)
Audacity (which is free)
Content
Sound Forge
Content
GarageBand
Content
Adobe Audition .
Content
Whether you work from home or an office, producing professional quality audio doesn’t have to be difficult, time-consuming, or expensive. All it takes is the right equipment, the right environment, and the right software.
Whether you work from home or an office, producing professional quality audio doesn’t have to be difficult, time-consuming, or expensive. All it takes is the right equipment, the right environment, and the right software.