ATD Blog
Toolbox Tip: Using Sliders in Articulate Storyline 2
Mon Oct 20 2014

Content

Content
Content
Content
Content
When it comes to e-learning design, I’ve always been a huge fan of anything that lets me easily add interactivity to my courses without requiring knowledge of a programming language. Because of this, the new sliders feature is perhaps my favorite new addition in Articulate Storyline 2.
When it comes to e-learning design, I’ve always been a huge fan of anything that lets me easily add interactivity to my courses without requiring knowledge of a programming language. Because of this, the new sliders feature is perhaps my favorite new addition in Articulate Storyline 2.
Content
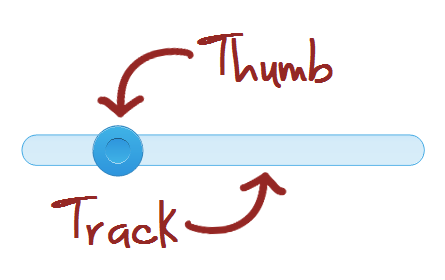
Sliders are simple interactive objects that let your users move a “thumb” along a track. What I love about sliders is that you can use them to create an endless number of learning interactions. For example, you can let your users move a slider to adjust the value of a number or to change the state of an object.
Sliders are simple interactive objects that let your users move a “thumb” along a track. What I love about sliders is that you can use them to create an endless number of learning interactions. For example, you can let your users move a slider to adjust the value of a number or to change the state of an object.
Content
When you add a slider to your course, a numeric variable is automatically created. This variable is used to track the position of the slider’s thumb along its track. As the user slides the thumb along the track, the value of the associated variable adjusts accordingly. How you choose to use the information stored in that variable is where things start to get really exciting.
When you add a slider to your course, a numeric variable is automatically created. This variable is used to track the position of the slider’s thumb along its track. As the user slides the thumb along the track, the value of the associated variable adjusts accordingly. How you choose to use the information stored in that variable is where things start to get really exciting.
Content
You can adjust the range of numbers used in the slider, the initial value/position, and the number of stops on the slider.
You can adjust the range of numbers used in the slider, the initial value/position, and the number of stops on the slider.
Content
From there, you can set up triggers to perform different actions when the user moves the slider to different positions. Let's explore that more with an example.
From there, you can set up triggers to perform different actions when the user moves the slider to different positions. Let's explore that more with an example.
Content
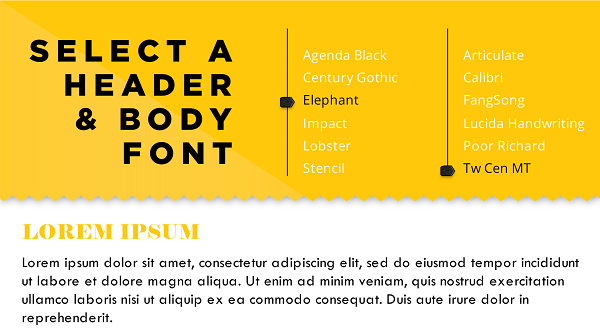
In this font selector, the user can adjust two different sliders. Based on each slider's position, a trigger is fired that changes the state of the appropriate text box to display the chosen font.
In this font selector, the user can adjust two different sliders. Based on each slider's position, a trigger is fired that changes the state of the appropriate text box to display the chosen font.
Content
Font Pairings Demo: PLAY | DOWNLOAD
Font Pairings Demo: PLAY |DOWNLOAD
Content
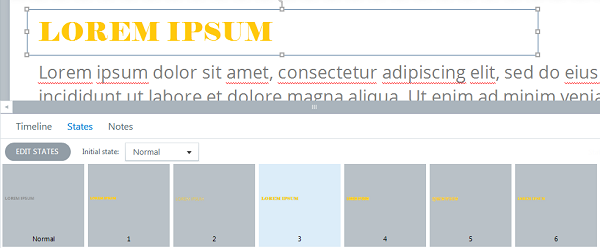
To accomplish this, I first created multiple states for the header and body text boxes, changing the font style for each.
To accomplish this, I first created multiple states for the header and body text boxes, changing the font style for each.
Content
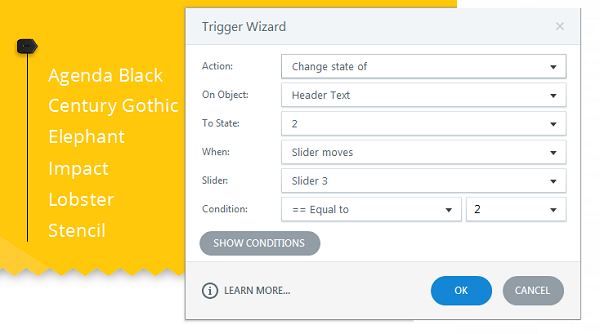
From there, I added a trigger to change the state of the heading or body font text box based on the position of the slider.
From there, I added a trigger to change the state of the heading or body font text box based on the position of the slider.
Content
This is just one simple example to show what you can do with sliders, and I’m not even scratching the surface. If you want to see more examples of what you can do with sliders, check out some of these awesome examples shared in the Articulate Community .
This is just one simple example to show what you can do with sliders, and I’m not even scratching the surface. If you want to see more examples of what you can do with sliders, check out some of these awesome examples shared in the Articulate Community.