ATD Blog
Best Practices for Creating 360 Video
Wed Feb 26 2020
Content
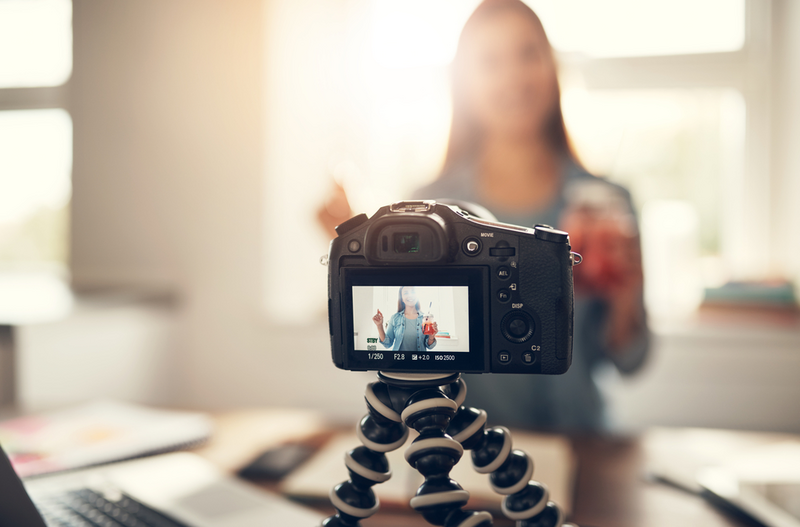
With the ever-increasing number of digital photos and videos being recorded these days, many of us have gained experience in framing and shooting media. However, the jump to immersive 360-degree media brings a new set of possibilities, challenges, and other things to keep in mind.
With the ever-increasing number of digital photos and videos being recorded these days, many of us have gained experience in framing and shooting media. However, the jump to immersive 360-degree media brings a new set of possibilities, challenges, and other things to keep in mind.
Everything Is in the Shot
Content
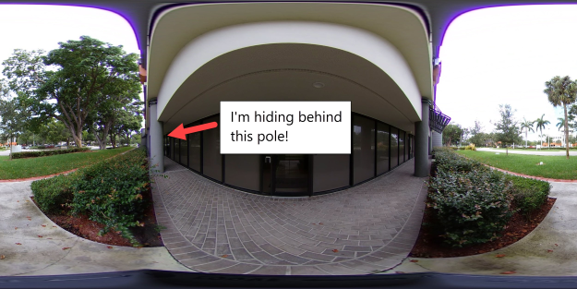
There is no "behind the camera." When shooting any scene, you need to either leave the room or make yourself part of the shot. Most of the cameras that are available today work with a companion smartphone app that allows you to remotely take a photo or video, giving you the opportunity to hide close by, out of sight. Recently, I did a shoot of the front of our office and used a pole in the front of the building to remove myself from the scene.
There is no "behind the camera." When shooting any scene, you need to either leave the room or make yourself part of the shot. Most of the cameras that are available today work with a companion smartphone app that allows you to remotely take a photo or video, giving you the opportunity to hide close by, out of sight. Recently, I did a shoot of the front of our office and used a pole in the front of the building to remove myself from the scene.
Limit Movement of the Camera
Content
When planning your shoot, try to let the person viewing the experience choose where they go. Use hotspots to allow for "teleporting" around an area or between scenes in a first-person perspective. Any disconnect between the camera's movements and the viewer's body movements can be disorienting at best and nauseating at worst. We've seen enough YouTube videos of grandma riding a roller coaster in VR to know that camera movement can be problematic in an immersive situation.
When planning your shoot, try to let the person viewing the experience choose where they go. Use hotspots to allow for "teleporting" around an area or between scenes in a first-person perspective. Any disconnect between the camera's movements and the viewer's body movements can be disorienting at best and nauseating at worst. We've seen enough YouTube videos of grandma riding a roller coaster in VR to know that camera movement can be problematic in an immersive situation.
Camera Positioning
Content
The camera should be four to five feet away from the subject. That same experience you get when someone is "in your personal space" is easy to achieve and generally not what you want in VR. Conversely, objects too far away from the camera quickly fade out of view, so if detail is important, it needs to be close.
The camera should be four to five feet away from the subject. That same experience you get when someone is "in your personal space" is easy to achieve and generally not what you want in VR. Conversely, objects too far away from the camera quickly fade out of view, so if detail is important, it needs to be close.

Content
Equally important is that the camera should be slightly below eye level of the subject being filmed.
Equally important is that the camera should be slightly below eye level of the subject being filmed.
Content
Be aware of where stitch lines will fall in the final shot. If your camera has two fisheye lenses, objects that lie along the "prime meridian" between the lenses can be subject to distortion from the stitching process, so limit the movement that is visible to the camera in these areas.
Be aware of where stitch lines will fall in the final shot. If your camera has two fisheye lenses, objects that lie along the "prime meridian" between the lenses can be subject to distortion from the stitching process, so limit the movement that is visible to the camera in these areas.
Content
Finally, even though it is capturing a full 360 degrees, the front of the camera is important. It is what will be the initial view that a person sees.
Finally, even though it is capturing a full 360 degrees, the front of the camera is important. It is what will be the initial view that a person sees.
Lighting
Content
Often, for standard photography, you will use additional lighting or a flash to illuminate an area that doesn't have good natural light.
Often, for standard photography, you will use additional lighting or a flash to illuminate an area that doesn't have good natural light.
Content
The best solution is to have natural lighting in the scene but that's not always possible. If there is an area that’s important to have light on, try using extra lighting behind other objects in the scene, or small directional spotlights pointing toward the subject and away from the camera.
The best solution is to have natural lighting in the scene but that's not always possible. If there is an area that’s important to have light on, try using extra lighting behind other objects in the scene, or small directional spotlights pointing toward the subject and away from the camera.
Resolution
Content
Always capture your source material in 4K resolution or higher. Remember that 4K resolution is split between multiple lenses and spread over a full 360 degrees, so 4K images and video only give you HD in each hemisphere. If the resulting video is too large or requires too much bandwidth, you can lower the resolution to HD if the subject matter doesn’t need it, but you can't go the other way.
Always capture your source material in 4K resolution or higher. Remember that 4K resolution is split between multiple lenses and spread over a full 360 degrees, so 4K images and video only give you HD in each hemisphere. If the resulting video is too large or requires too much bandwidth, you can lower the resolution to HD if the subject matter doesn’t need it, but you can't go the other way.
After the Shot
Content
One thing that most new 360 videographers don’t realize is, unlike 360 images, the raw video that comes off the camera isn’t ready to be used. When the initial video is taken from the camera, the video looks like this:
One thing that most new 360 videographers don’t realize is, unlike 360 images, the raw video that comes off the camera isn’t ready to be used. When the initial video is taken from the camera, the video looks like this:
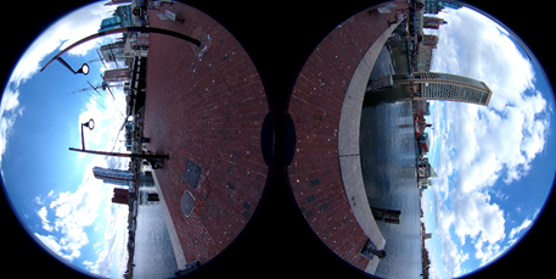
Content
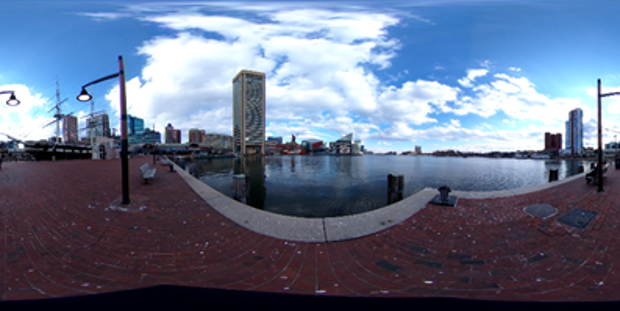
Each frame of the video consists of two fisheye views from in front of and behind the camera. The video then needs to be run through dedicated stitching software that comes with the camera and matches the edges of the fisheye view together to form a sphere. When that process is done, you get an equirectangular image that looks like this:
Each frame of the video consists of two fisheye views from in front of and behind the camera. The video then needs to be run through dedicated stitching software that comes with the camera and matches the edges of the fisheye view together to form a sphere. When that process is done, you get an equirectangular image that looks like this:
Content
Equirectangular is the actual format used for video and images, and it's a big word that just means that it represents a full sphere mapped on to a rectangular surface, which gives the stretched appearance on the top and bottom of the image. These images taken by the camera are a single frame, so they’re not as processor intensive to map to equirectangular format and can be stitched on the actual device.
Equirectangular is the actual format used for video and images, and it's a big word that just means that it represents a full sphere mapped on to a rectangular surface, which gives the stretched appearance on the top and bottom of the image. These images taken by the camera are a single frame, so they’re not as processor intensive to map to equirectangular format and can be stitched on the actual device.
Video Compression
Content
4K video can generate incredibly large files that are hard to work with on your local machine, much less able to be streamed over the Internet or transferred to a phone.
4K video can generate incredibly large files that are hard to work with on your local machine, much less able to be streamed over the Internet or transferred to a phone.
Content
Let's examine the case of uncompressed 4K video. To be considered 4K, each frame should be a minimum of 3840 by 1920 pixels. Each pixel requires 24 bits to represent its color, and for 30 frames a second, you would get:
Let's examine the case of uncompressed 4K video. To be considered 4K, each frame should be a minimum of 3840 by 1920 pixels. Each pixel requires 24 bits to represent its color, and for 30 frames a second, you would get:

Content
At 22MB per second, a one-minute video would be more than 1.3GB in size. This would be an unusable amount of data generated from the camera for most people and certainly not something that could be used on the Internet.
At 22MB per second, a one-minute video would be more than 1.3GB in size. This would be an unusable amount of data generated from the camera for most people and certainly not something that could be used on the Internet.
Content
Fortunately, the cameras do some compression before storing it. For example, a Ricoh Theta V produces approximately 430MB of 4K video for each minute recorded, which is about one-third of the size of the raw footage.
Fortunately, the cameras do some compression before storing it. For example, a Ricoh Theta V produces approximately 430MB of 4K video for each minute recorded, which is about one-third of the size of the raw footage.
Content
This is helpful for manipulating the files themselves, but it is still a large file. Consider the bandwidth that would be required to view this file over the Internet, keeping in mind:
This is helpful for manipulating the files themselves, but it is still a large file. Consider the bandwidth that would be required to view this file over the Internet, keeping in mind:

Content
So, to stream that video smoothly would require a dedicated 70Mbit connection or a whole lot of time to download it. This is not something that can be done in most situations.
So, to stream that video smoothly would require a dedicated 70Mbit connection or a whole lot of time to download it. This is not something that can be done in most situations.
Content
The answer to the problem is video compression. Experiment a bit with high, medium, and adaptive bit rates to see if you can achieve a good balance between file size and quality. There are also free options available to handle video compression that works very well. Give HandBrake a try.
The answer to the problem is video compression. Experiment a bit with high, medium, and adaptive bit rates to see if you can achieve a good balance between file size and quality. There are also free options available to handle video compression that works very well. Give HandBrake a try.
Content
Want to learn more? Join me at the ATD 2020 International Conference & EXPO for the session, Virtual Reality in Real Life: A Case Study in Ultrasound Training .
Want to learn more? Join me at the ATD 2020 International Conference & EXPO for the session, Virtual Reality in Real Life: A Case Study in Ultrasound Training.